<?xml version="1.0" encoding="utf-8"?><feed xmlns="http://www.w3.org/2005/Atom" ><generator uri="https://jekyllrb.com/" version="3.10.0">Jekyll</generator><link href="https://blog.anders-lauridsen.dk/feed.xml" rel="self" type="application/atom+xml" /><link href="https://blog.anders-lauridsen.dk/" rel="alternate" type="text/html" /><updated>2025-05-24T09:57:35+00:00</updated><id>https://blog.anders-lauridsen.dk/feed.xml</id><title type="html">A blog</title><subtitle>Sometimes I write about stuff</subtitle><author><name>Anders Lauridsen</name></author><entry><title type="html">Migrating Services from my old to my new Server</title><link href="https://blog.anders-lauridsen.dk/migrating_apps" rel="alternate" type="text/html" title="Migrating Services from my old to my new Server" /><published>2025-05-19T00:00:00+00:00</published><updated>2025-05-19T00:00:00+00:00</updated><id>https://blog.anders-lauridsen.dk/migrating_apps</id><content type="html" xml:base="https://blog.anders-lauridsen.dk/migrating_apps"><![CDATA[<p>After running several self-hosted services on an aging Acer desktop, I finally decided it was time to consolidate everything onto a new, more capable server. This post walks through my experience migrating Home Assistant, Tandoor (with a switch to Mealie), and eventually Nextcloud to the new setup—now powered by TrueNAS and Docker. Along the way, I hit a few snags but also found some pleasant surprises. Here’s how it all went.</p>

<ul>
  <li><a href="#why-migrate">Why Migrate</a>
    <ul>
      <li><a href="#home-assistant">Home Assistant</a>
        <ul>
          <li><a href="#installation-on-truenas">Installation on TrueNAS</a></li>
          <li><a href="#migration">Migration</a></li>
          <li><a href="#troubleshooting">Troubleshooting</a></li>
        </ul>
      </li>
      <li><a href="#tandoor">Tandoor</a>
        <ul>
          <li><a href="#easy-migration-and-pwa-instead-of-3rd-party-app">Easy migration, and PWA instead of 3rd party app</a></li>
        </ul>
      </li>
      <li><a href="#nextcloud">Nextcloud</a></li>
    </ul>
  </li>
</ul>

<h1 id="why-migrate">Why Migrate</h1>
<p>I described my old server setup briefly in <a href="creating-a-landing-page-and-why-llms-wont-take-our-jobs">this</a> post but here’s a brief excerpt from that post:</p>

<blockquote>
  <p>My dad had an old Acer Aspire XC-886 desktop lying around with a 9th-gen i3 CPU, which I ended up using for the server. I bought two 1TB SSDs and installed Ubuntu Server 22.04 on the desktop. I used <a href="https://linux.die.net/man/8/mdadm">mdadm</a> to create a RAID 1 array over the two SSDs for redundancy. <br /> <br /> I installed <a href="https://nextcloud.com/">Nextcloud</a> to back up all of the videos and photos from the hard drive. I chose Nextcloud because it did what I needed (and more), seemed easy to install, and offered Office-like capabilities I thought I might use later. Eventually, I bought a domain, got a static IP from my ISP, and made the service available to my family. <br /> <br />As time went on, I wanted to run more software on the Acer server. I tried running <a href="https://pi-hole.net/">Pi-hole</a> (but DNS is a pain, so I ditched that) and ended up running <a href="https://www.home-assistant.io/">Home Assistant</a> instead. <a href="smarthome_saga_part_1">This</a> is my latest post on that journey at the time of writing. <br /> <br /> So that was my setup before building the new server: an old Acer desktop running Home Assistant and Nextcloud, with ports forwarded for remote access.</p>
</blockquote>

<p>I wanted to have everything “under one roof”, more or less. While I am ok running extra infrastructure, such as a proxy manager or geofencing, on other hardware, I wanted all of my services running on one server, preferably using the same technology (namely Docker in the form of TrueNAS Apps). This would, in theory, make backups easier, and general system administration.</p>

<p>I had 3 services running on my old server: Home Assistant, Tandoor, and Nextcloud. I will be covering each migration in increasing difficulty.</p>

<h2 id="home-assistant">Home Assistant</h2>

<p>My old Home Assistant setup consisted of a Docker Compose file along with a mounted volume in <code class="language-plaintext highlighter-rouge">/opt/homeassistant/</code>. a setup copied from a blog I unfortunately don’t remember the name of.</p>

<div class="language-yaml highlighter-rouge"><div class="highlight"><pre class="highlight"><code><span class="na">version</span><span class="pi">:</span> <span class="s1">'</span><span class="s">3'</span>
<span class="na">services</span><span class="pi">:</span>
  <span class="na">homeassistant</span><span class="pi">:</span>
    <span class="na">container_name</span><span class="pi">:</span> <span class="s">homeassistant</span>
    <span class="na">image</span><span class="pi">:</span> <span class="s2">"</span><span class="s">ghcr.io/home-assistant/home-assistant:stable"</span>
    <span class="na">volumes</span><span class="pi">:</span>
      <span class="pi">-</span> <span class="s">/opt/homeassistant/config:/config</span>
      <span class="pi">-</span> <span class="s">/etc/localtime:/etc/localtime:ro</span>
    <span class="na">restart</span><span class="pi">:</span> <span class="s">unless-stopped</span>
    <span class="na">privileged</span><span class="pi">:</span> <span class="no">true</span>
    <span class="na">network_mode</span><span class="pi">:</span> <span class="s">host</span>
    <span class="na">ports</span><span class="pi">:</span>
      <span class="pi">-</span> <span class="s2">"</span><span class="s">8123:8123"</span>
    <span class="na">environment</span><span class="pi">:</span>
      <span class="pi">-</span> <span class="s">DISABLE_JEMALLOC=1</span>
</code></pre></div></div>

<p>This install has been relatively unproblematic, and when I plugged in my Zigbee dongle it ‘just worked’. I specifically used the <em>ZBDongle-E</em> model from Sonoff.</p>

<p>Given that this ‘just works’ setup was based on Docker, and I wanted to move it to a Docker container in TrueNAS it should be easy right? To my surprise it actually was.</p>

<h3 id="installation-on-truenas">Installation on TrueNAS</h3>

<p>I created the following datasets in TrueNAS using the App preset in the dataset creation wizard. 
<img src="../assets/img/posts/2025-04-13/datasets.png" alt="Overview of datasets" />
In the Home Assistant configuration wizard I set all storage options to use a host path, and pointed each host path to the corresponding dataset. The only extra option which had to be set was the “Automatic Permissions” option.
<img src="../assets/img/posts/2025-04-13/pg_permissions.png" alt="config of postgres host path" />
Other than that, my Home Assistant instance was up and running without too much hassle.</p>

<h3 id="migration">Migration</h3>

<p>I created a backup on my original Home Assistant instance, downloaded it to my PC, and in the new instance I chose the “restore” option on the welcome page. It was <em>almost</em> that easy…</p>

<h3 id="troubleshooting">Troubleshooting</h3>

<p>My ZigBee integration simply would not work. All configuration was imported correctly, but it seemed that Home Assistant could not connect to the device.</p>

<p>My first troubleshooting step was to check that the container could actually see the device, which was confirmed with <code class="language-plaintext highlighter-rouge">lsusb</code>.
<img src="../assets/img/posts/2025-04-13/lsusb.png" alt="output from lsusb" /></p>

<p>After digging around in the terminal for a while I went back into the Home Assistant config, and found the “device” section of the config page. It turns out that I needed to map my device to the container, in order for it to use it. This was something I had not considered since <code class="language-plaintext highlighter-rouge">lsusb</code> showed the device from a shell in the container.</p>

<h2 id="tandoor">Tandoor</h2>

<p>I had installed Tandoor using Docker Compose on the old server.
TrueNAS doesn’t directly support Tandoor,
and for now I don’t want to install community supported apps.</p>

<p>Researching self-hosted recipe software can be bewildering,
but I ended up using <a href="https://mealie.io/">Mealie</a> instead.</p>

<h3 id="easy-migration-and-pwa-instead-of-3rd-party-app">Easy migration, and PWA instead of 3rd party app</h3>

<p>Migrating from Tandoor to Mealie is rather easy and intuitive,
and installing the PWA is just as easy.
Good thing <a href="https://techcrunch.com/2024/03/01/apple-reverses-decision-about-blocking-web-apps-on-iphones-in-the-eu/">Apple reversed their decision about PWAs in the EU</a>.</p>

<h2 id="nextcloud">Nextcloud</h2>
<p>…</p>

<p>I haven’t migrated Nextcloud yet.</p>]]></content><author><name>Anders Lauridsen</name></author><category term="journal" /><category term="home server" /><category term="nextcloud" /><category term="tandoor mealie" /><category term="migration" /><category term="truenas" /><summary type="html"><![CDATA[After running several self-hosted services on an aging Acer desktop, I finally decided it was time to consolidate everything onto a new, more capable server. This post walks through my experience migrating Home Assistant, Tandoor (with a switch to Mealie), and eventually Nextcloud to the new setup—now powered by TrueNAS and Docker. Along the way, I hit a few snags but also found some pleasant surprises. Here’s how it all went.]]></summary><media:thumbnail xmlns:media="http://search.yahoo.com/mrss/" url="https://blog.anders-lauridsen.dk/posts/2025-04-13/migration-3020862114.jpg" /><media:content medium="image" url="https://blog.anders-lauridsen.dk/posts/2025-04-13/migration-3020862114.jpg" xmlns:media="http://search.yahoo.com/mrss/" /></entry><entry><title type="html">Creating a Landing Page and why LLMs Wont Take Our Jobs Any Time Soon</title><link href="https://blog.anders-lauridsen.dk/creating-a-landing-page-and-why-llms-wont-take-our-jobs" rel="alternate" type="text/html" title="Creating a Landing Page and why LLMs Wont Take Our Jobs Any Time Soon" /><published>2025-03-27T00:00:00+00:00</published><updated>2025-03-27T00:00:00+00:00</updated><id>https://blog.anders-lauridsen.dk/creating-a-landing-page-and-why-llms-wont-take-our-jobs</id><content type="html" xml:base="https://blog.anders-lauridsen.dk/creating-a-landing-page-and-why-llms-wont-take-our-jobs"><![CDATA[<p>When I was a teenager, I was often in charge of using the family camera to photograph birthdays and other get-togethers. Over the years, I became more and more interested in photography, and it turned into a hobby that I love.</p>

<p>Last summer, I bought an expensive camera since the one I inherited from my grandfather was starting to show its age (a Canon EOS 400D DSLR). So, I upgraded to a Canon EOS RP instead.</p>

<p>Fast forward half a year, and I’m getting the hang of this camera. I want to showcase my photographs beyond just posting them on Instagram. I already have a domain, and Adobe Portfolio is included in my Creative Cloud subscription, so I figured I might as well use it to host my “portfolio”. Now, I just need a landing page to link to both my blog and my portfolio.</p>

<hr />

<p><strong>Table of Contents</strong></p>

<ul>
  <li><a href="#my-landing-page-and-overall-setup">My Landing Page and Overall Setup</a>
    <ul>
      <li><a href="#i-have-no-idea-how-to-write-javascript">I Have No Idea How to Write JavaScript</a></li>
      <li><a href="#my-overall-setup-for-my-personal-sites">My Overall Setup for My Personal Sites</a></li>
    </ul>
  </li>
  <li><a href="#why-im-not-scared-that-llms-will-take-our-jobs-anytime-soon">Why I’m Not Scared That LLMs Will Take Our Jobs Anytime Soon</a></li>
</ul>

<hr />

<h1 id="my-landing-page-and-overall-setup">My Landing Page and Overall Setup</h1>

<p><img src="../assets/img/posts/2025-03-27/landing_page_full.png" alt="Screenshot of landing page" /></p>

<p>
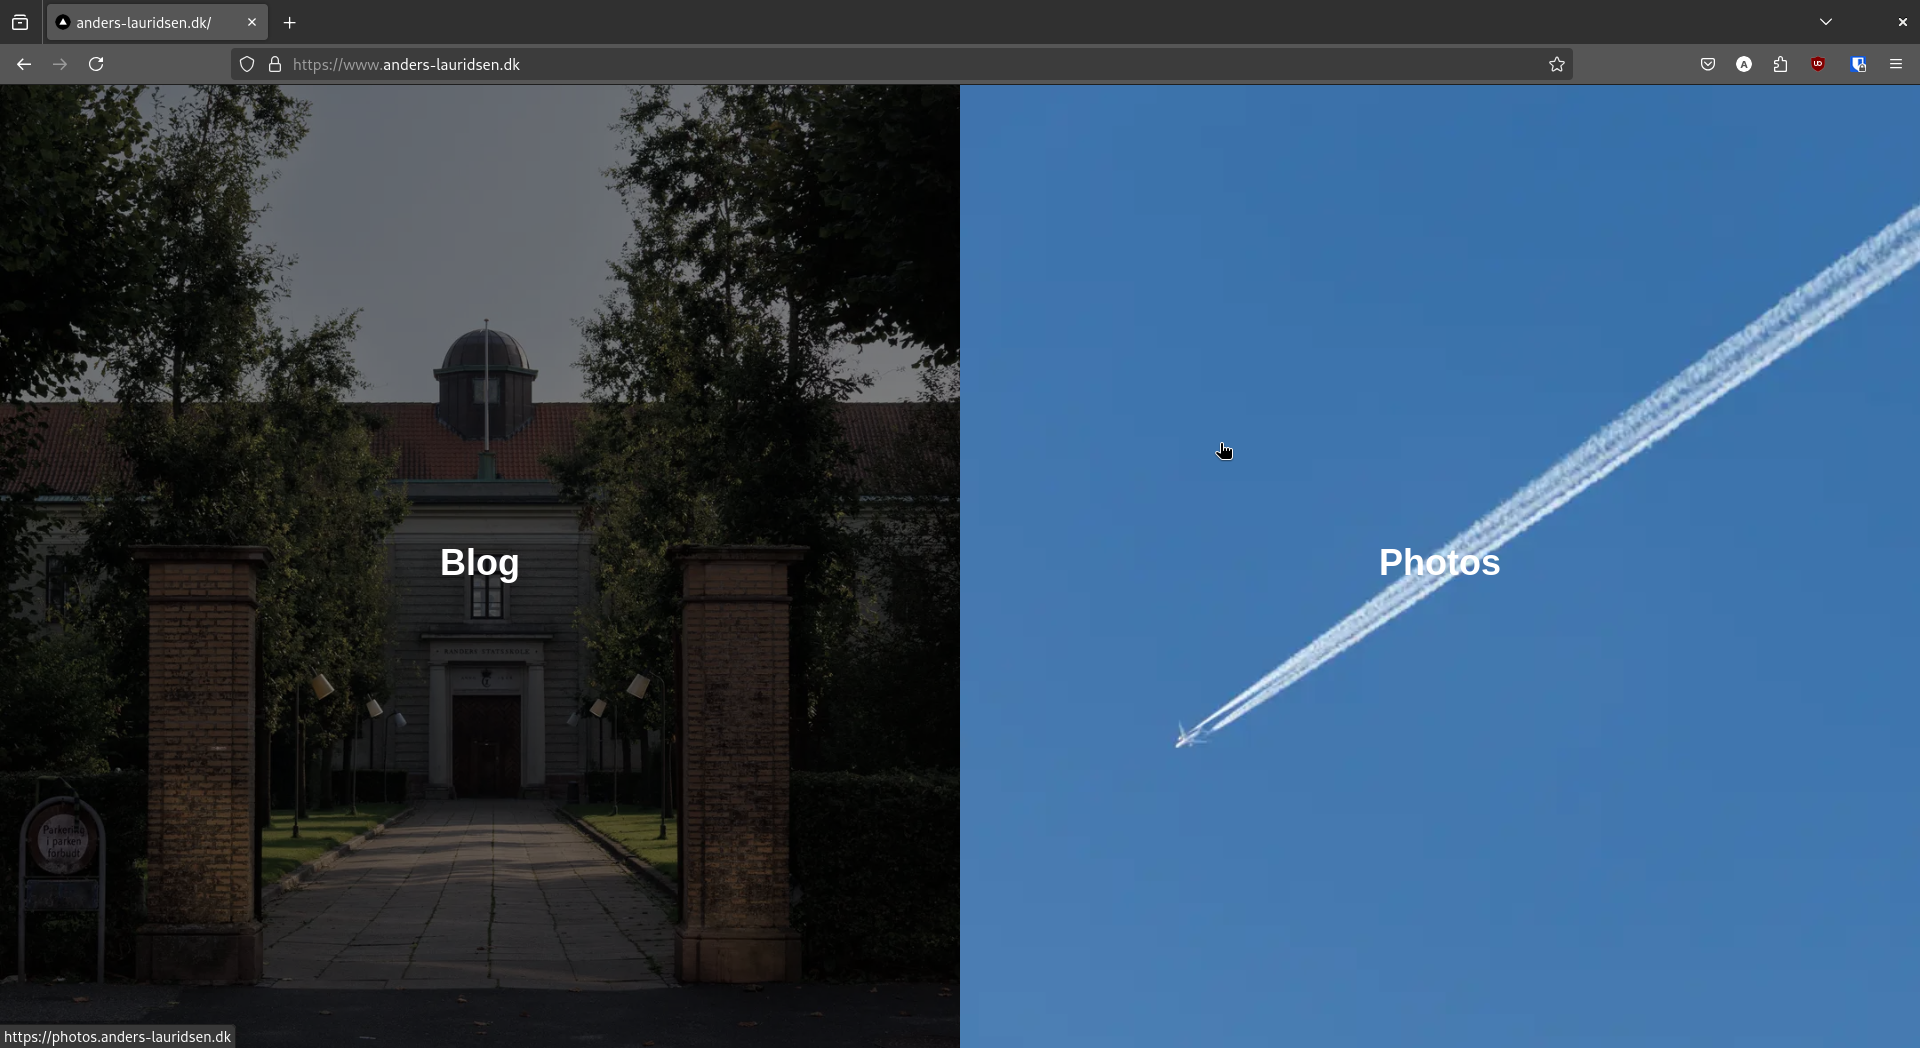
The image above is a screenshot of my landing page at the time of writing. It consists of a split view, with one image in each section, overlaid with text. When the mouse is not hovering over an image, the saturation and brightness are reduced. When hovered over, the images animate to remove these effects and zoom in slightly. The split orientation depends on the aspect ratio of the window, meaning that the page will split horizontally on phone screens. The “Blog” image links to <a href="https://blog.anders-lauridsen.dk/">blog.anders-lauridsen.dk</a>, while the “Photos” image links to <a href="https://photos.anders-lauridsen.dk/">photos.anders-lauridsen.dk</a>.</p>

<p>The landing page is written in JavaScript, and I should mention that I had never written any JavaScript before this. I’m still not entirely sure about some of the specifics I used for this project.</p>

<h2 id="i-have-no-idea-how-to-write-javascript">I Have No Idea How to Write JavaScript</h2>

<p>So why did I choose JavaScript?</p>

<p>Before creating the landing page, I wanted to explore my hosting options, as I didn’t want to self-host it. After some research, I decided on Vercel because of its attractive free tier for website hosting. It also happens that Vercel is the company behind Next.js, so it made sense to use their own framework for my landing page.</p>

<p>I set up a <a href="https://github.com/ahll19/landing-page">GitHub repo</a>, opened up ChatGPT, and got to work. I actually struggled quite a bit, which I’ll touch on later in this post.</p>

<h2 id="my-overall-setup-for-my-personal-sites">My Overall Setup for My Personal Sites</h2>

<p>Right now, I have three websites under the domain <a href="https://www.anders-lauridsen.dk/">anders-lauridsen.dk</a>: my landing page, my blog, and my portfolio. My blog is still hosted on GitHub Pages, as I described in <a href="https://blog.anders-lauridsen.dk/creating-my-website">this post</a>. My portfolio is hosted on Adobe’s servers and created using their Adobe Portfolio tool. My landing page, as mentioned earlier, is hosted on Vercel.</p>

<p>Setting up HTTPS with GitHub was a bit of a hassle, as their system is very particular about DNS configurations. However, I’m happy that my entire setup is free (aside from my Adobe subscription and domain registration) and doesn’t require me to host anything myself.</p>

<h1 id="why-im-not-scared-that-llms-will-take-our-jobs-anytime-soon">Why I’m Not Scared That LLMs Will Take Our Jobs Anytime Soon</h1>

<p>ChatGPT did a job of creating the website as I described (notice I didn’t say <em>a good job</em>). Unfortunately, I didn’t save my chat history, but suffice it to say that my first prompt got me 95% of the way there. The rest of my tokens were spent trying to get it to fix an error in its own code. Since I was using screenshots to debug, I couldn’t continue the conversation after running out of free tokens—I would’ve had to start a new chat with another model.</p>

<p>Instead of opening a new ChatGPT chat, I decided to test Gemini from Google to see if it could fix ChatGPT’s blunders. I spent about an hour trying, but to no avail. In the end, I resorted to the old-fashioned method: actually reading the code on my screen.</p>

<p>The code responsible for creating the image, text, link, and animation is within this <code class="language-plaintext highlighter-rouge">div</code> below:</p>

<div class="language-javascript highlighter-rouge"><div class="highlight"><pre class="highlight"><code><span class="o">&lt;</span><span class="nx">div</span> <span class="nx">className</span><span class="o">=</span><span class="dl">"</span><span class="s2">relative h-full w-full</span><span class="dl">"</span><span class="o">&gt;</span>
    <span class="o">&lt;</span><span class="nx">Image</span>
    <span class="nx">src</span><span class="o">=</span><span class="dl">"</span><span class="s2">/IMG_0141.jpg</span><span class="dl">"</span>
    <span class="nx">alt</span><span class="o">=</span><span class="dl">"</span><span class="s2">Blog Image</span><span class="dl">"</span>
    <span class="nx">fill</span>
    <span class="nx">priority</span>
    <span class="nx">sizes</span><span class="o">=</span><span class="p">{</span><span class="nx">isVerticalSplit</span> <span class="p">?</span> <span class="dl">"</span><span class="s2">50vw</span><span class="dl">"</span> <span class="p">:</span> <span class="dl">"</span><span class="s2">50vh</span><span class="dl">"</span><span class="p">}</span>
    <span class="nx">className</span><span class="o">=</span><span class="dl">"</span><span class="s2">object-cover transition-transform duration-500 filter grayscale-[30%] brightness-[50%] group-hover:grayscale-0 group-hover:brightness-100 group-hover:scale-110</span><span class="dl">"</span>
    <span class="o">/&gt;</span>
    <span class="o">&lt;</span><span class="nx">div</span> <span class="nx">className</span><span class="o">=</span><span class="dl">"</span><span class="s2">absolute inset-0 flex flex-col items-center justify-center bg-opacity-30</span><span class="dl">"</span><span class="o">&gt;</span>
    <span class="o">&lt;</span><span class="nx">span</span> <span class="nx">className</span><span class="o">=</span><span class="dl">"</span><span class="s2">text-white text-4xl font-bold mb-2</span><span class="dl">"</span><span class="o">&gt;</span><span class="nx">Blog</span><span class="o">&lt;</span><span class="sr">/span</span><span class="err">&gt;
</span>    <span class="o">&lt;</span><span class="sr">/div</span><span class="err">&gt;
</span><span class="o">&lt;</span><span class="sr">/div</span><span class="err">&gt;
</span><span class="o">&lt;</span><span class="sr">/a</span><span class="err">&gt;
</span><span class="o">&lt;</span><span class="nx">a</span>
<span class="nx">href</span><span class="o">=</span><span class="dl">"</span><span class="s2">https://photos.anders-lauridsen.dk</span><span class="dl">"</span>
<span class="nx">className</span><span class="o">=</span><span class="p">{</span><span class="s2">`relative overflow-hidden group </span><span class="p">${</span>
    <span class="nx">isVerticalSplit</span> <span class="p">?</span> <span class="dl">"</span><span class="s2">w-1/2 h-full</span><span class="dl">"</span> <span class="p">:</span> <span class="dl">"</span><span class="s2">w-full h-1/2</span><span class="dl">"</span>
<span class="p">}</span><span class="s2">`</span><span class="p">}</span>
<span class="o">&gt;</span>
</code></pre></div></div>

<p>The problematic part of the code was in this line:</p>

<div class="language-javascript highlighter-rouge"><div class="highlight"><pre class="highlight"><code><span class="o">&lt;</span><span class="nx">Image</span>
<span class="nx">src</span><span class="o">=</span><span class="dl">"</span><span class="s2">/IMG_0141.jpg</span><span class="dl">"</span>
<span class="nx">alt</span><span class="o">=</span><span class="dl">"</span><span class="s2">Blog Image</span><span class="dl">"</span>
<span class="nx">fill</span>
<span class="nx">priority</span>
<span class="nx">sizes</span><span class="o">=</span><span class="p">{</span><span class="nx">isVerticalSplit</span> <span class="p">?</span> <span class="dl">"</span><span class="s2">50vw</span><span class="dl">"</span> <span class="p">:</span> <span class="dl">"</span><span class="s2">50vh</span><span class="dl">"</span><span class="p">}</span>
<span class="nx">className</span><span class="o">=</span><span class="dl">"</span><span class="s2">object-cover transition-transform duration-500 filter grayscale-[30%] brightness-[50%] group-hover:grayscale-0 group-hover:brightness-100 group-hover:scale-110</span><span class="dl">"</span>
<span class="o">/&gt;</span>
</code></pre></div></div>

<p>ChatGPT had included the <code class="language-plaintext highlighter-rouge">bg-black</code> style in the className of this <code class="language-plaintext highlighter-rouge">&lt;Image&gt;</code> tag. I hadn’t noticed this at first (and even if I had, I wouldn’t have known it was an issue, since I’ve never done frontend development before). Gemini didn’t catch it either. After about 10 minutes of reading through the code, I finally spotted it and removed it—solving all my issues (at least with my landing page).</p>

<p>So why am I not scared that LLMs will take our jobs anytime soon? Because, honestly, they’re still quite dumb (sort of). Modern LLMs are amazing <em>tools</em> that allow people like me to create a landing page in an afternoon, even with no prior JavaScript experience. They can serve as a useful sounding board and work well for rubber-duck debugging. But as much as tech bros and AI influencers like to call LLMs “AI,” they still lack the “intelligence” part of artificial intelligence. Predicting tokens is no substitute for critical thinking and actual experience—it’s just a neat productivity booster (and does a decent job of proofreading blog posts).</p>

<p>Maybe I’ll be proven wrong within the next five years when AI has taken 90% of tech jobs and Teslas have actual self-driving. But I doubt it.</p>]]></content><author><name>Anders Lauridsen</name></author><category term="journal" /><category term="ai" /><category term="website" /><category term="javascript" /><category term="react" /><category term="nextjs" /><summary type="html"><![CDATA[When I was a teenager, I was often in charge of using the family camera to photograph birthdays and other get-togethers. Over the years, I became more and more interested in photography, and it turned into a hobby that I love.]]></summary><media:thumbnail xmlns:media="http://search.yahoo.com/mrss/" url="https://blog.anders-lauridsen.dk/posts/2025-03-27/landing_page.png" /><media:content medium="image" url="https://blog.anders-lauridsen.dk/posts/2025-03-27/landing_page.png" xmlns:media="http://search.yahoo.com/mrss/" /></entry><entry><title type="html">Building a Proper Home Server</title><link href="https://blog.anders-lauridsen.dk/building-a-proper-homeserver" rel="alternate" type="text/html" title="Building a Proper Home Server" /><published>2025-01-29T00:00:00+00:00</published><updated>2025-01-29T00:00:00+00:00</updated><id>https://blog.anders-lauridsen.dk/building-a-proper-homeserver</id><content type="html" xml:base="https://blog.anders-lauridsen.dk/building-a-proper-homeserver"><![CDATA[<p>Ever since I was a teenager, I’ve wanted a home server. Not because I needed to host specific software or had concrete plans for it, but mainly because I saw people on YouTube who had them, and I thought it looked cool.</p>

<p>Flash forward a couple of years, and I’m visiting my parents. They pull out an old hard drive enclosure so we can watch some old pictures and home videos from vacations and such. It’s a great time. When we’re done, I ask how old the enclosure is and whether they keep any backups. The hard drive in the enclosure is from 2006, and no, they do not keep any backups. So that’s 40GB of childhood memories stored in an enclosure that could fail at any moment. That was when I decided I needed to back it up somehow. And that’s why I built my first home server.</p>

<p><strong>Table of Contents</strong></p>

<hr />

<ul>
  <li><a href="#the-old-setup">The Old Setup</a></li>
  <li><a href="#the-new-setup">The New Setup</a>
    <ul>
      <li><a href="#choice-of-software">Choice of Software</a></li>
      <li><a href="#hardware">Hardware</a></li>
      <li><a href="#putting-it-all-together">Putting it all Together</a></li>
    </ul>
  </li>
  <li><a href="#conclusion">Conclusion</a></li>
</ul>

<hr />

<h1 id="the-old-setup">The Old Setup</h1>

<p>My dad had an old Acer Aspire XC-886 desktop lying around with a 9th-gen i3 CPU, which I ended up using for the server. I bought two 1TB SSDs and installed Ubuntu Server 22.04 on the desktop. I used <a href="https://linux.die.net/man/8/mdadm">mdadm</a> to create a RAID 1 array over the two SSDs for redundancy.</p>

<p>I installed <a href="https://nextcloud.com/">Nextcloud</a> to back up all of the videos and photos from the hard drive. I chose Nextcloud because it did what I needed (and more), seemed easy to install, and offered Office-like capabilities I thought I might use later. Eventually, I bought a domain, got a static IP from my ISP, and made the service available to my family.</p>

<p>As time went on, I wanted to run more software on the Acer server. I tried running <a href="https://pi-hole.net/">Pi-hole</a> (but DNS is a pain, so I ditched that) and ended up running <a href="https://www.home-assistant.io/">Home Assistant</a> instead. <a href="https://anders-lauridsen.dk/smarthome_saga_part_1">This</a> is my latest post on that journey at the time of writing.</p>

<p>So that was my setup before building the new server: an old Acer desktop running Home Assistant and Nextcloud, with ports forwarded for remote access.</p>

<h1 id="the-new-setup">The New Setup</h1>

<p>I got a Raspberry Pi 5 for my birthday and started tinkering with homelabbing again. I knew I wanted to run more services locally, such as <a href="https://jellyfin.org/">Jellyfin</a>, and I wanted a “proper” server to do so—”proper” meaning a dedicated build. I also wanted an easier and more reliable way to back up my data remotely, which felt clunky given that I had installed Nextcloud using Snap and intended to run everything else through Docker Compose.</p>

<h2 id="choice-of-software">Choice of Software</h2>

<p>I created a list of the services I wanted to host:</p>

<ul>
  <li>Home Assistant</li>
  <li>Nextcloud</li>
  <li>Jellyfin</li>
  <li>One or more SMB shares with plenty of space for my Canon camera photos</li>
</ul>

<p>Around this time, I heard about <a href="https://hexos.com/">HexOS</a>, a paid software built on <a href="https://www.truenas.com/truenas-scale/">TrueNAS Scale</a>, which supposedly makes it easier to use TrueNAS. Even if I didn’t end up using HexOS, I could always fall back to TrueNAS, and I liked the project, so I decided to support them by buying a license.</p>

<h2 id="hardware">Hardware</h2>

<p>With the software plan in place, I needed hardware to match these requirements:</p>

<ul>
  <li>Plenty of hard drive bays</li>
  <li>Enough CPU power for seamless movie streaming while running all my services</li>
  <li>Ample RAM for caching files (TrueNAS Scale uses ZFS, which benefits from extra RAM)</li>
  <li>A case that wouldn’t make my living room look like a server room</li>
</ul>

<p>Here’s what I bought:</p>

<table>
  <thead>
    <tr>
      <th>Part</th>
      <th>Model</th>
    </tr>
  </thead>
  <tbody>
    <tr>
      <td>CPU</td>
      <td>Intel i5-13400F</td>
    </tr>
    <tr>
      <td>Motherboard</td>
      <td>GIGABYTE H610I</td>
    </tr>
    <tr>
      <td>RAM</td>
      <td>Corsair Vengeance LPX DDR4-3200 64GB CL16</td>
    </tr>
    <tr>
      <td>Storage</td>
      <td>SK Hynix Platinum P41 SSD 500GB (boot), 2 x Seagate Exos 7E10 4TB HDD (mass)</td>
    </tr>
    <tr>
      <td>Power Supply</td>
      <td>Lian Li SP750 SFX Gold</td>
    </tr>
    <tr>
      <td>Case</td>
      <td>Jonsbo N3 Mini-ITX</td>
    </tr>
    <tr>
      <td>Fans</td>
      <td>2 Noctua NF-A8</td>
    </tr>
  </tbody>
</table>

<p>I still need to buy some Noctua fans for the hard drive bay, as the included ones are quite loud.</p>

<h2 id="putting-it-all-together">Putting it all Together</h2>

<p>Building the system was great fun, though I wouldn’t recommend assembling in the Jonsbo case without prior experience. I built the SSD, motherboard, CPU, and RAM outside the case, added a GPU for video output, and installed the OS. I later realized that using a laptop with a replaceable SSD would have made installation easier.</p>

<p>HexOS lived up to its branding—it was easy to install and set up an SMB share. However, many supported apps still require configuration through the TrueNAS dashboard. Despite that, I do recommend HexOS for quickly turning an old PC into a NAS.</p>

<p>Right now, my setup is a bit scattered, but I plan to consolidate everything onto the HexOS system. Currently, I have:</p>

<ul>
  <li><strong>Raspberry Pi 5</strong>: Runs <a href="https://nginxproxymanager.com/">Nginx Proxy Manager</a> for handling SSL certificates and routing traffic.</li>
  <li><strong>Acer Server</strong>: Runs Home Assistant, Nextcloud, and <a href="https://tandoor.dev/">Tandoor</a>. I plan to migrate these services to HexOS and repurpose the SSDs.</li>
  <li><strong>HexOS Server</strong>: Runs <a href="https://www.freshrss.org/">FreshRSS</a>, <a href="https://github.com/pawelmalak/flame">Flame</a>, Jellyfin, <a href="https://www.qbittorrent.org/">qBittorrent</a>, <a href="https://www.ui.com/">Unifi Controller</a>, <a href="https://github.com/alexta69/metube">MeTube</a>, and SMB shares.</li>
</ul>

<p>One limitation is that HexOS only allows expanding storage pools with three or more drives, meaning I’ll need to buy three new HDDs before expanding storage.</p>

<h1 id="conclusion">Conclusion</h1>

<p>It might have been wiser to buy a motherboard with 2.5Gb Ethernet, and had I known about the storage pool expansion limitation, I would have bought another drive upfront. Otherwise, I’m very proud of the system.</p>

<p>My homelab setup is still somewhat janky, with three different installation methods (Snap, Docker in TrueNAS, and Docker Compose on Ubuntu) across three systems. However, it has the potential to become a solid setup.</p>

<p>There’s still a lot of work to do—migrating services, upgrading hardware, and setting up proper backups—but it’s been reliable these past few weeks, and best of all, it requires NO subscription fees!</p>]]></content><author><name>Anders Lauridsen</name></author><category term="journal" /><category term="HexOS" /><category term="TrueNAS" /><category term="Hardware" /><category term="Server" /><category term="Selfhosted" /><category term="Unix" /><category term="DIY" /><summary type="html"><![CDATA[Ever since I was a teenager, I’ve wanted a home server. Not because I needed to host specific software or had concrete plans for it, but mainly because I saw people on YouTube who had them, and I thought it looked cool.]]></summary><media:thumbnail xmlns:media="http://search.yahoo.com/mrss/" url="https://blog.anders-lauridsen.dk/royalty_free/server.jpeg" /><media:content medium="image" url="https://blog.anders-lauridsen.dk/royalty_free/server.jpeg" xmlns:media="http://search.yahoo.com/mrss/" /></entry><entry><title type="html">Installing Zellij on Fedora</title><link href="https://blog.anders-lauridsen.dk/installing-zellij-on-fedora" rel="alternate" type="text/html" title="Installing Zellij on Fedora" /><published>2024-12-10T00:00:00+00:00</published><updated>2024-12-10T00:00:00+00:00</updated><id>https://blog.anders-lauridsen.dk/installing-zellij-on-fedora</id><content type="html" xml:base="https://blog.anders-lauridsen.dk/installing-zellij-on-fedora"><![CDATA[<p>This guide outlines the process of installing <a href="https://zellij.dev/">Zellij</a>,
a Rust-based terminal workspace and multiplexer, on <a href="https://fedoraproject.org/">Fedora Linux</a>. While Zellij
can typically be installed using Cargo, the Rust package manager, I encountered
compilation issues on a fresh Fedora installation. Finding limited documentation
for resolving this, I’ve compiled this step-by-step guide to help others.</p>

<p><strong>Table of Contents</strong></p>

<hr />

<ul>
  <li><a href="#installing-rustup">Installing Rustup</a></li>
  <li><a href="#dependencies">Dependencies</a></li>
  <li><a href="#compiling-zellij">Compiling Zellij</a></li>
</ul>

<hr />

<h1 id="installing-rustup">Installing Rustup</h1>
<p>The recommended way of installing Rust on Linux is using Rustup.
I ran the following command from the [Rust install site].</p>

<p>The recommended way to install Rust on Linux is via Rustup. You can use the following
command from the <a href="https://www.rust-lang.org/tools/install">official Rust installation site</a>:</p>

<div class="language-sh highlighter-rouge"><div class="highlight"><pre class="highlight"><code>curl <span class="nt">--proto</span> <span class="s1">'=https'</span> <span class="nt">--tlsv1</span>.2 <span class="nt">-sSf</span> https://sh.rustup.rs | sh
</code></pre></div></div>
<p>Choose the recommended settings during the installation process.
This will set up Rust quickly and easily.</p>

<h1 id="dependencies">Dependencies</h1>
<p>Trying to install Zellij without installing additional dependencies will result
in errors. These are the dependencies I installed before Zellij would compile,</p>
<ul>
  <li><code class="language-plaintext highlighter-rouge">gcc</code></li>
  <li><code class="language-plaintext highlighter-rouge">openssl</code></li>
  <li><code class="language-plaintext highlighter-rouge">rust-openssl-sys-devel</code></li>
  <li><code class="language-plaintext highlighter-rouge">perl</code>
which can all be installed with <code class="language-plaintext highlighter-rouge">dnf</code>.</li>
</ul>

<p>The step which fails without these dependencies is when the Rust compiler tries to build
openssl. In order to build openssl Perl is needed, so I suspect that you only need to run</p>

<div class="language-sh highlighter-rouge"><div class="highlight"><pre class="highlight"><code><span class="nb">sudo </span>dnf <span class="nb">install </span>perl
</code></pre></div></div>

<p>However, if this does not work, you might want to try and install all the other
dependencies. With that in place, you should be able to install Zellij.</p>

<h1 id="compiling-zellij">Compiling Zellij</h1>
<p>With Rust and the necessary dependencies installed, you can compile Zellij using Cargo.
Follow the instructions from the <a href="https://zellij.dev/documentation/installation.html">official Zellij documentation</a>:</p>
<div class="language-sh highlighter-rouge"><div class="highlight"><pre class="highlight"><code>cargo <span class="nb">install</span> <span class="nt">--locked</span> zellij
</code></pre></div></div>

<p>If you’ve installed the dependencies mentioned earlier, this command should execute without any errors.</p>]]></content><author><name>Anders Lauridsen</name></author><category term="journal" /><category term="Fedora" /><category term="Rust" /><category term="Zellij" /><category term="Unix" /><summary type="html"><![CDATA[This guide outlines the process of installing Zellij, a Rust-based terminal workspace and multiplexer, on Fedora Linux. While Zellij can typically be installed using Cargo, the Rust package manager, I encountered compilation issues on a fresh Fedora installation. Finding limited documentation for resolving this, I’ve compiled this step-by-step guide to help others.]]></summary><media:thumbnail xmlns:media="http://search.yahoo.com/mrss/" url="https://blog.anders-lauridsen.dk/posts/2024-12-10/image.png" /><media:content medium="image" url="https://blog.anders-lauridsen.dk/posts/2024-12-10/image.png" xmlns:media="http://search.yahoo.com/mrss/" /></entry><entry><title type="html">Smartifying Dumb Speakers</title><link href="https://blog.anders-lauridsen.dk/smartifying_dumb_speakers" rel="alternate" type="text/html" title="Smartifying Dumb Speakers" /><published>2024-04-27T00:00:00+00:00</published><updated>2024-04-27T00:00:00+00:00</updated><id>https://blog.anders-lauridsen.dk/smartifying_dumb_speakers</id><content type="html" xml:base="https://blog.anders-lauridsen.dk/smartifying_dumb_speakers"><![CDATA[<p>The goal of this project is to make an old speaker function as a smart speaker. I want to select a speaker on Spotify, and then have some of my old speakers from the 80’s play that music. I already did something like this in my <a href="https://anders-lauridsen.dk/smarthome_saga_part_1">Smarthome Saga Part 1</a> blog post. The issue with that setup is that every set of speakers need to be listed as a single speaker on Spotify, which prohibits multiroom audio. <br />
So the goal is to be able to play music from Spotify on some old speakers as if they were modern smart speakers, in a way that scales easily to more than that speaker. It should also be able to integrate this into Home Assistant, so that I only need to interface with my smarthome in one place.</p>

<p>Some details on the software side of things are skipped. This is where I am just following <a href="https://whynot.guide/posts/howtos/multiroom-media/">this guide</a> from Andreas Skoglund closely. I do not want to just re-post what he has already written up, and I recommend supporting him on <a href="https://ko-fi.com/whynotguide">Ko-Fi</a> if you find this guide useful.</p>

<p>Also big thanks to <a href="https://www.linkedin.com/in/nikolaj-kr%C3%A6gp%C3%B8th/">Nikolaj Krægpøth</a> for helping out with this project. He saved a lot of time, and probably some headaches, in the electronics part of this project.</p>

<p><strong>Table of Contents</strong></p>

<hr />

<ul>
  <li><a href="#software">Software</a>
    <ul>
      <li><a href="#snapcast">Snapcast</a>
        <ul>
          <li><a href="#first-setup">First Setup</a></li>
          <li><a href="#daemonizing-the-snapserver">Daemonizing the Snapserver</a></li>
        </ul>
      </li>
      <li><a href="#librespot">Librespot</a></li>
    </ul>
  </li>
  <li><a href="#the-speakers">The Speakers</a>
    <ul>
      <li><a href="#internals-of-the-speakers">Internals of the Speakers</a></li>
      <li><a href="#amplifiers-and-sound">Amplifiers and Sound</a></li>
    </ul>
  </li>
  <li><a href="#conclusion">Conclusion</a>
    <ul>
      <li><a href="#issues-and-further-work">Issues and Further Work</a></li>
    </ul>
  </li>
</ul>

<hr />

<h1 id="software">Software</h1>
<p>My choice of software is very much dictated by the blog post from Andreas Skoglund, since I want to get a proof of concept up and running as soon as possible. I will for sure add more software to the stack in a future iteration of this project.</p>

<h2 id="snapcast">Snapcast</h2>
<p>On the <a href="https://github.com/badaix/snapcast">GitHub page</a> of Snapcast they say that</p>

<blockquote>
  <p>Snapcast is a multiroom client-server audio player, where all clients are time synchronized with the server to play perfectly synced audio. It’s not a standalone player, but an extension that turns your existing audio player into a Sonos-like multiroom solution.</p>
</blockquote>

<p>This is more or less exactly what I want in an audio setup. This section walks through how I set up my current configuration of Snapcast.</p>

<h3 id="first-setup">First Setup</h3>
<p>Since Snapcast is distributed to Debian based systems, I could just download and install the packages from the <a href="https://github.com/badaix/snapcast/releases">release page</a>.</p>

<p>After installing the correct packages I went and tested the setup. I have my Pi 5 and Pi 3A+ hooked up to the same network, and my headphones plugged into the AUX port of the Pi 3A+. After opening up a terminal on the Pi 3A+ I opened <code class="language-plaintext highlighter-rouge">alsamixer</code> to turn the volume, in order to not blow out the speakers of my headphones. I then ran the <code class="language-plaintext highlighter-rouge">snapclient</code> command to spawn the client, and logged into my Pi 5. On the Pi 5 I have tmux installed, and opened up a session. In the first window I started the server by running <code class="language-plaintext highlighter-rouge">snapserver</code>. I opened up a new window, and then ran <code class="language-plaintext highlighter-rouge">cat /dev/urandom &gt; /tmp/snapfifo</code>. This should start playing white noise on the headphones plugged into the headphones.</p>

<p>The files <code class="language-plaintext highlighter-rouge">/dev/random</code> and <code class="language-plaintext highlighter-rouge">/dev/urandom</code> provide an interface to the random number generator in the Linux kernel, the difference between them being that the form the former will block reading if the system is not able to generate “random enough” numbers, and the latter will never be blocked. This is lifted from <a href="https://linuxhandbook.com/dev-random-urandom/">this post</a> from the Linux Handbook.</p>

<p>When I first did this I ran into permission issues, since Snapcast creates a user and group for that user called <code class="language-plaintext highlighter-rouge">snapserver</code>, on the server. I had to change the ownership of the file using <code class="language-plaintext highlighter-rouge">chown</code> in order to test this in my case, but switched the owner back after testing.</p>

<h3 id="daemonizing-the-snapserver">Daemonizing the Snapserver</h3>
<p>When I was first messing around with Snapcast I accidentally set some configuration options in one of the configuration files for <code class="language-plaintext highlighter-rouge">snapserver</code>. This led to me wasting at least an hour before figuring out why I could not start the server as a service. <br />
With <code class="language-plaintext highlighter-rouge">/etc/default/snapserver</code> file on my Pi 5 which looks like this</p>

<div class="language-yaml highlighter-rouge"><div class="highlight"><pre class="highlight"><code><span class="c1"># Start the server, used only by the init.d script</span>
<span class="s">START_SNAPSERVER=true</span>

<span class="c1"># Additional command line options that will be passed to snapserver</span>
<span class="c1"># note that user/group should be configured in the init.d script or the systemd unit file</span>
<span class="c1"># For a list of available options, invoke "snapserver --help"</span>
<span class="s">SNAPSERVER_OPTS=""</span>
</code></pre></div></div>
<p>I was able to enable and start the server using <code class="language-plaintext highlighter-rouge">systemctl</code> as you would any other daemon.</p>

<p>To test this I downloaded a <code class="language-plaintext highlighter-rouge">.wav</code> file using wget, and added the following option under the <code class="language-plaintext highlighter-rouge">[stream]</code> tag in <code class="language-plaintext highlighter-rouge">/etc/snapserver.conf</code> on the Pi 5.</p>

<div class="language-yaml highlighter-rouge"><div class="highlight"><pre class="highlight"><code><span class="nn">...</span>
<span class="pi">[</span><span class="nv">stream</span><span class="pi">]</span>
<span class="s">stream = file:///opt/a2002011001-e02.wav?name=test</span>
<span class="nn">...</span>
</code></pre></div></div>
<p>This allows me to go the the local ip of the Pi 5 on port 1780 in a browser, and see a web interface for Snapcast, with the clients listed on that site:
<img src="../assets/img/posts/2024-03-28/snapcast webview.png" alt="Snapcast Webview from my Windows Desktop" /></p>

<p><strong>Note:</strong> <em>I never actually enabled the client service on the Pi 3A+, but it seems that it is enabled, and works as it should. I did not have to set it up any further than that. I also do not remember how I pointed the client to the server’s IP, but if it works it works.</em></p>

<h2 id="librespot">Librespot</h2>
<p>I have written about <a href="https://github.com/dtcooper/raspotify">Raspotify</a> before in my post <a href="https://anders-lauridsen.dk/smarthome_saga_part_1">Smarthome Saga Part 1</a>, and it does seem like the easiest way to get what I wanted up and running. I am however, still mostly following the blog post from Andreas Skoglund, and as such I will be installing <a href="https://github.com/librespot-org/librespot">Librespot</a> as he recommends in his post. <br />
The biggest difference in practice is that I had to compile the Rust code myself, instead of running the install script from Raspotify.</p>

<p>I did have to do one thing which was not mentioned in Andreas’ blog post. I had to install some extra dependencies (<code class="language-plaintext highlighter-rouge">libasound2-dev, portaudio19-dev, build-essential, libpulse-dev, libdbus-1-dev</code>) on my Pi 5. This was pointed out in <a href="https://github.com/Spotifyd/spotifyd/issues/659#issuecomment-674641548">this</a> comment on GitHub.</p>

<p>After configuring the stream as he did, with my own username and password of course, it worked perfectly. I went in and commented out the only other stream (<code class="language-plaintext highlighter-rouge">/tmp/snapfifo</code>), and now the Pi 5 is listed on the network as a Spotify Connect device, which automatically casts the sound from spotify to all other devices.</p>

<h1 id="the-speakers">The Speakers</h1>
<p>The picture in the intro is the internals of one of my 2 VERY old Dali speakers. They seemed to be a good fit for this project because they were VERY cheap on Facebook Marketplace.</p>

<h2 id="internals-of-the-speakers">Internals of the Speakers</h2>
<p>I took them apart to get an idea of how they were wired up. There are 2 cement resistors (white boxy things), which are also the only 2 components where the specs are known. The big yellow capacitor has <em>some</em> capacitance, and the inductors also have <em>some</em> inductance.  I had hoped to get the exact values and derive the filter specifications on what is passed to the woofer and tweeter. This idea was scrapped when I couldn’t find these values.</p>

<h2 id="amplifiers-and-sound">Amplifiers and Sound</h2>
<p>I bought a “TPA3116D2” amplifier of off AliExpress which in theory is way overspecced for this build. They take around 18V input, with a wide range of acceptable input voltages. It also takes the sound signal over 2 terminals. And of course it has an amplified output of some sort as well.</p>

<p>In order to power the amplifier I cut and stripped the wire of an old laptop charger which runs at 19V and 1.75A, which should be plenty to power the speakers.</p>

<p>In order to get sound to the amplifier I cut and stripped the wires of an old pair of crappy headphones, which connects to the Pi 3A+ over an AUX jack.</p>

<p>To get the sound to the speaker I used some old speaker cables I had lying around in the apartment.</p>

<p><img src="../assets/img/posts/2024-04-27/speaker_connections.jpg" alt="PoC" /></p>

<p>The picture above shows the wiring of this system (the middle terminals are the power-in from the laptop charger). Between the audio-in and power-in terminals there is a potentiometer used to set the volume of the speakers. In a future iteration of this project I will find a maximum acceptable volume for the speakers, and “lock it in”, to remove the possibility of blowing out the speakers.</p>

<h1 id="conclusion">Conclusion</h1>
<p>PoC could be short for proof of concept, or it could be short for piece of crap. Both of these acronyms are good descriptors for how this project turned out.</p>

<p>This PoC technically worked! I was able to find the Snapcast server on the Spotify Discover list. Playing music then casts the music from the Pi 5 to the Pi 3A+. This sound is then amplified using the AliExpress amplifier and sent to the speakers. I have to admit that I did a little dance and started dancing when the speaker played the song.</p>

<p>The sound quality of this PoC is not very good, and the wiring is horrendous.</p>

<h2 id="issues-and-further-work">Issues and Further Work</h2>
<p>One big issue is that the signal quality is not all that great, and nothing is grounded. This results in a hissing and popping sound constantly playing on the speaker. As of now there is also no Home Assistant Integration.</p>

<p>I am not going to keep the system running, since I would lose my mind of that noise was constantly playing in my apartment. It is also not the nicest thing to look at in it’s current state. I am also not allowed to keep the Pi 3A+, unfortunately.</p>

<p>Next iteration of this project would be to install the Snapclient software on a few old Android phones, and ground the connection to remove the hissing noise. I would also like to move as much of the electronics into the body of the speakers as possible. If it is within scope I would also like to integrate the Snapcast system into Home Assistant.</p>

<p>All in all this project has been a success, since I accomplished the goals I set out, even though the PoC can best be described as “janky”.</p>]]></content><author><name>Anders Lauridsen</name></author><category term="journal" /><category term="speakers" /><category term="diy" /><category term="electronics" /><category term="snapcast" /><category term="librespot" /><category term="spotify" /><summary type="html"><![CDATA[The goal of this project is to make an old speaker function as a smart speaker. I want to select a speaker on Spotify, and then have some of my old speakers from the 80’s play that music. I already did something like this in my Smarthome Saga Part 1 blog post. The issue with that setup is that every set of speakers need to be listed as a single speaker on Spotify, which prohibits multiroom audio. So the goal is to be able to play music from Spotify on some old speakers as if they were modern smart speakers, in a way that scales easily to more than that speaker. It should also be able to integrate this into Home Assistant, so that I only need to interface with my smarthome in one place.]]></summary><media:thumbnail xmlns:media="http://search.yahoo.com/mrss/" url="https://blog.anders-lauridsen.dk/posts/2024-04-27/internals.jpg" /><media:content medium="image" url="https://blog.anders-lauridsen.dk/posts/2024-04-27/internals.jpg" xmlns:media="http://search.yahoo.com/mrss/" /></entry><entry><title type="html">Smarthome Saga Part 1 - Getting Started</title><link href="https://blog.anders-lauridsen.dk/smarthome_saga_part_1" rel="alternate" type="text/html" title="Smarthome Saga Part 1 - Getting Started" /><published>2024-03-18T00:00:00+00:00</published><updated>2024-03-18T00:00:00+00:00</updated><id>https://blog.anders-lauridsen.dk/smarthome_saga_part_1</id><content type="html" xml:base="https://blog.anders-lauridsen.dk/smarthome_saga_part_1"><![CDATA[<p>Since I first got my own place I’ve wanted to get a “smarthome”. My journey started out with buying an Ikea Trådfri bulb and hub, so that I could have cool RGB lights in my one-bedroom apartment. That was also around the time I first got into Linux and Python. My first foray into interacting with my smarthome outside the scope of the Ikea smarthome app, was using <a href="https://github.com/home-assistant-libs/pytradfri">pytradfri</a> on my Linux laptop to control my lights. This was immensely fun, and lasted about 30 minutes before I borked my lights, and had to do a reset on them.</p>

<p>Over the years since I have bought more lights, some Google smart speakers, and a smart TV (which is just a TV these days…). But I never really got into self-hosting smart solutions since then, until 2023 when I received a Raspberry Pi 5 for my birthday.</p>

<p>This blog-post details my first dive into self-hosting my smarthome, and my hope is that it will be one of many posts talking about setting up cool features, only really allowed by self-hosting. In this post I will talk about how I set up conditional reminders, and turned my VERY old speaker system into a “smart” speaker system by using the Spotify connect protocol.</p>

<p><strong>Table of Contents</strong></p>

<hr />
<ul>
  <li><a href="#1-hardware">1. Hardware</a>
    <ul>
      <li><a href="#raspberry-pi-5">Raspberry Pi 5</a></li>
      <li><a href="#ikea-trådfri">Ikea TRÅDFRI</a></li>
      <li><a href="#google-nest-mini">Google Nest Mini</a></li>
      <li><a href="#old-speaker-system">Old Speaker System</a></li>
    </ul>
  </li>
  <li><a href="#2-software">2. Software</a>
    <ul>
      <li><a href="#docker-and-home-assistant">Docker and Home Assistant</a></li>
      <li><a href="#raspotify">Raspotify</a></li>
    </ul>
  </li>
  <li><a href="#3-conclusion">3. Conclusion</a></li>
</ul>

<hr />

<h1 id="1-hardware">1. Hardware</h1>
<h2 id="raspberry-pi-5">Raspberry Pi 5</h2>
<p>As mentioned before, I got a <a href="https://www.raspberrypi.com/products/raspberry-pi-5/">Raspberry Pi 5</a> my birthday in 2023, which has since served as the brains of my smarthome operations. The only additional hardware I have for the Pi is <a href="https://www.raspberrypi.com/products/raspberry-pi-5/">the Raspberry pi 5 case</a>, <a href="https://www.raspberrypi.com/products/27w-power-supply/">the power supply</a>, an SD card, and a USB-to-Aux cable.</p>

<p>In the future I would like to add the NVME hat which Jeff Geerling has an excellent <a href="https://www.jeffgeerling.com/blog/2023/nvme-ssd-boot-raspberry-pi-5">blog post</a> about, and a Z-wave USB controller. The Z-wave controller would be needed in order to not rely on the IKEA Tradfri hub, and other hubs from Z-wave device manufactures like Phillips.</p>

<h2 id="ikea-trådfri">Ikea TRÅDFRI</h2>
<p>I have a few bulbs from the TRÅDFRI lineup from Ikea. All of them are hooked up to an Ikea TRÅDFRI Hub, using one of their remotes. My plan is to use the Z-wave controller in order to get rid of this hub, and these controllers, since they only really clutter my home.</p>

<p>If I wanted to add more Z-wave controlled devices in the future I would also like to not have 5 different hubs hooked up to ethernet and power all of the time.</p>

<p>Only one of these lights have died on me since I bought them. It was slightly over 3 years old, and the others (between 2 and 4 years old at this point) are still going strong.</p>

<h2 id="google-nest-mini">Google Nest Mini</h2>
<p>I have two of these small smart speakers, one of them I bought second hand, and the other I bought new. Their sound is decent, but my hope is that I would have these replaced with proper speakers in the future. I also find that the Google “smart” assistant is often the worst way to get anything accomplished.</p>

<p>I only really use it for conversions between imperial and real units when cooking, or perhaps setting alarms (which could just as well be done from my phone).</p>

<h2 id="old-speaker-system">Old Speaker System</h2>
<p>I don’t know which speakers I have right now, or which amp they are connected to. I do have plans for maybe opening up the amp to make it turn on when I connect to the Raspberry Pi. If I ever do that I will of course write down some details on what I’m using.</p>

<p>These old speakers really do sound great when a device is hooked up to the amplifier via Aux. I personally got them from a family member who did not have the space for them anymore, but similar speakers can be had on Facebook Marketplace for cheap.</p>

<h1 id="2-software">2. Software</h1>
<p>The software deployed so far has been rather plug and play, with only some slight configuration needing to be done. How my software is set up as of now will most likely change, maybe I will add <a href="https://developers.google.com/cast/docs/overview">Google Cast</a>, maybe not.</p>

<h2 id="docker-and-home-assistant">Docker and Home Assistant</h2>
<p>Docker is being used to host the <a href="https://hub.docker.com/r/homeassistant/home-assistant/">Home Assistant</a>, since native support for the Raspberry Pi 5 was added <a href="https://www.home-assistant.io/blog/2024/02/26/home-assistant-os-12-support-for-raspberry-pi-5/">a few months</a> after I set up my system…</p>

<p>Using Docker is not the worst thing every, since it does make porting easier, though I would like to experiment with installing it on the Pi directly, once I have another micro PC as the Pi Zero 2 W running Raspotify on the speaker system.</p>

<p>I used Docker-Compose to run the container, the guide I took inspiration from can be found <a href="https://www.thetechnerd.org/articles/installing-home-assistant-using-docker-a-step-by-step-guide">here</a>.</p>

<p>Here is my <code id="id" class="language-plaintext class highlighter-rouge">docker-compose.yaml</code></p>

<div class="language-yaml highlighter-rouge"><div class="highlight"><pre class="highlight"><code><span class="na">version</span><span class="pi">:</span> <span class="s1">'</span><span class="s">3'</span>
<span class="na">services</span><span class="pi">:</span>
  <span class="na">homeassistant</span><span class="pi">:</span>
    <span class="na">container_name</span><span class="pi">:</span> <span class="s">homeassistant</span>
    <span class="na">image</span><span class="pi">:</span> <span class="s2">"</span><span class="s">ghcr.io/home-assistant/home-assistant:stable"</span>
    <span class="na">volumes</span><span class="pi">:</span>
      <span class="pi">-</span> <span class="s">/opt/homeassistant/config:/config</span>
      <span class="pi">-</span> <span class="s">/etc/localtime:/etc/localtime:ro</span>
    <span class="na">restart</span><span class="pi">:</span> <span class="s">unless-stopped</span>
    <span class="na">privileged</span><span class="pi">:</span> <span class="no">true</span>
    <span class="na">network_mode</span><span class="pi">:</span> <span class="s">host</span>
    <span class="na">ports</span><span class="pi">:</span>
      <span class="pi">-</span> <span class="s2">"</span><span class="s">8123:8123"</span>
    <span class="na">environment</span><span class="pi">:</span>
      <span class="pi">-</span> <span class="s">DISABLE_JEMALLOC=1</span>
</code></pre></div></div>

<p>I might move to installing the new native Home Assistant software on the Pi, but that would necessitate a new single board computer for running Raspotify. I have not been able to get Bluetooth working in the Docker container, so installing the OS is appealing.</p>

<p>So far the only automation I have set up is my Google Nest speakers reminding to air out the apartment a couple of times each day, if I am home. Though, I do intend to add more automations once I am working full time and have a more fixed daily schedule.</p>

<h2 id="raspotify">Raspotify</h2>
<p><a href="https://dtcooper.github.io/raspotify/">Raspotify</a> is a wrapper around a Rust library, which allows it to function as a Spotify Connect receiver. It is technically for Debian 11, and Raspberry Pi OS is based on Debian 12, but the install script worked perfectly fine for me. If the script turned out to not work I don’t believe it would be too hard to Dockerize the application.</p>

<p>Setting up the software once it is installed was not all that difficult. The workflow consists mostly of</p>

<div class="language-shell highlighter-rouge"><div class="highlight"><pre class="highlight"><code><span class="nb">sudo </span>nano /etc/raspotify/conf
systemctl restart raspotify
</code></pre></div></div>

<p>Knowing what needs to be changed can be gathered by looking at</p>
<div class="language-shell highlighter-rouge"><div class="highlight"><pre class="highlight"><code>journalctl <span class="nt">-u</span> raspotify.service <span class="nt">-b</span>
</code></pre></div></div>

<p>I didn’t write my steps down, and this is not a detailed guide, so I won’t provide the exact steps to reproduce this setup in this post, but my configuration can be found in <a href="https://github.com/ahll19/ahll19.github.io/tree/master/docs/assets/etc_confs">the GitHub repo</a>.</p>

<p>I also used the <code id="id" class="language-plaintext class highlighter-rouge">alsamixer</code> CLI tool to turn up the volume on the Pi, in hopes that I would be able to go over a larger volume range once connected over Spotify. I don’t know how this is handled by Raspotify, and therefore I don’t know if it is worth replicating. But it is there as a troubleshooting step.</p>

<h1 id="3-conclusion">3. Conclusion</h1>
<p>Running Home Assistant in Docker on a machine that is also connected to my old speaker setup over AUX seems like a “proof of concept” state of my smarthome. Given this I would like to invest in some more hardware, such as a Z-wave USB controller, and some Z-wave devices which aren’t just smart lights, such as blinds or electricity meters.</p>

<p>I am pretty happy with what my smarthome is so far. I am able to play music on my nice speaker system, without hassle, or spending a fortune on new smart speakers. I am also a fan of being able to create automations without relying on <a href="https://killedbygoogle.com/">Google keeping functionality available for many years</a>, since it would be a shame if they killed off Google Home after I spend several hours setting up automations in that framework.</p>

<p>I am looking forward to adding more devices to my ecosystem, and playing around with Home Assistant some more.</p>]]></content><author><name>Anders Lauridsen</name></author><category term="journal" /><category term="python" /><summary type="html"><![CDATA[Since I first got my own place I’ve wanted to get a “smarthome”. My journey started out with buying an Ikea Trådfri bulb and hub, so that I could have cool RGB lights in my one-bedroom apartment. That was also around the time I first got into Linux and Python. My first foray into interacting with my smarthome outside the scope of the Ikea smarthome app, was using pytradfri on my Linux laptop to control my lights. This was immensely fun, and lasted about 30 minutes before I borked my lights, and had to do a reset on them.]]></summary><media:thumbnail xmlns:media="http://search.yahoo.com/mrss/" url="https://blog.anders-lauridsen.dk/royalty_free/pexels-jakub-zerdzicki-17536106.jpg" /><media:content medium="image" url="https://blog.anders-lauridsen.dk/royalty_free/pexels-jakub-zerdzicki-17536106.jpg" xmlns:media="http://search.yahoo.com/mrss/" /></entry><entry><title type="html">A Bad Popcorn Detection Algorithm</title><link href="https://blog.anders-lauridsen.dk/popcorn_detection" rel="alternate" type="text/html" title="A Bad Popcorn Detection Algorithm" /><published>2024-01-07T00:00:00+00:00</published><updated>2024-01-07T00:00:00+00:00</updated><id>https://blog.anders-lauridsen.dk/popcorn_detection</id><content type="html" xml:base="https://blog.anders-lauridsen.dk/popcorn_detection"><![CDATA[<p>My hope is that one day this blog will be filled with overengineered solutions to problems that either don’t exist, or are or of so little concern that they aren’t worth the effort of solving.</p>

<p>One such non-problem is knowing when microwave popcorn are done popping. I had the idea when I had some friends over for a visit, and we wanted popcorn. I didn’t want to leave the conversation, but I didn’t want to leave the conversation. And while waiting for the popcorn to pop I started to wonder how one might automate the process of determining the doneness of microwave popcorn. My thought process was that since instructions on popcorn boxes often tell you to check the time between pops, if I could detect the individual pops, the challenge of determining doneness would be trivial.</p>

<p>The code I wrote for this blog post, and the current state of the project, can be found at <a href="https://github.com/ahll19/popcorn_detection">This GitHub Repo</a></p>

<hr />

<h2 id="table-of-contents"><strong>Table of Contents</strong></h2>
<ul>
  <li><a href="#1-exploration">1. Exploration</a></li>
  <li><a href="#2-my-naive-algorithm">2. My Naive Algorithm</a></li>
  <li><a href="#3-does-the-algorithm-detect-popcorn">3 Does the algorithm detect popcorn?</a></li>
  <li><a href="#4-does-the-algorithm-work-a-second-time">4 Does the algorithm work a second time?</a></li>
  <li><a href="#5-conclusion">5 Conclusion</a></li>
</ul>

<hr />

<h1 id="1-exploration">1. Exploration</h1>
<p>In order to test how I could detect individual pops, I needed to collect some data. This was done through a highly scientific process:</p>

<center>Make microwave popcorn while recording it one my phone.</center>

<p>After collecting data I loaded the resulting mp3 file into Python, in order to get a sense of what the data might look like.</p>

<p>My phone seems to have recorded at $32,000Hz$, which allows us plenty of resolution in frequency to analyze the popping of popcorn. In the figures below we see the waveform that the phone recorded, and the spectrogram of that waveform.</p>

<p><img src="../assets/img/posts/2024-01-07/full_waveform.png" alt="Waveform of the popcorn popping" /></p>

<p><img src="../assets/img/posts/2024-01-07/full_spectgram.png" alt="Spectrogram of the popcorn popping" /></p>

<p>Looking at the waveform we see quite a lot of noise from the microwave, which seems to be on the low end of the frequency spectrum, when looking at the spectrogram. We also see a big loss in energy at the top of the frequency range of the spectrogram, which I honestly can’t explain, other than my phone might not be able to pick up such high frequencies. From the spectrogram it looks as though the popcorn might be visible as vertical lines on the spectrogram, meaning the individual pops are quite broad spectrum. So in designing the algorithm which is going to detect pops we assume two things for now:</p>
<ol>
  <li>The pops are more or less uniform in the frequency range of $2000Hz$ to $10,000Hz$.</li>
  <li>The energy of the noise produced by the microwave is mostly of frequencies lower than $4000Hz$.</li>
</ol>

<p>Using this let’s create a band pass filter using <code class="language-plaintext highlighter-rouge">Scipy</code>, and set the critical frequencies to $f_{c1}=4000Hz$ and $f_{c2}=10,000Hz$. Filtering a signal according to a Butterworth band pass filter can easily be achieved by the following code.</p>

<div class="language-python highlighter-rouge"><div class="highlight"><pre class="highlight"><code><span class="n">x</span><span class="p">,</span> <span class="n">sr</span> <span class="o">=</span> <span class="n">audio2numpy</span><span class="p">.</span><span class="n">audio_from_file</span><span class="p">(</span><span class="s">"popcorn.mp3"</span><span class="p">)</span>
<span class="n">x</span> <span class="o">/=</span> <span class="n">np</span><span class="p">.</span><span class="nb">max</span><span class="p">(</span><span class="n">np</span><span class="p">.</span><span class="nb">abs</span><span class="p">(</span><span class="n">x</span><span class="p">))</span>  <span class="c1"># Normalize the recorded waveform
</span><span class="n">t</span> <span class="o">=</span> <span class="n">np</span><span class="p">.</span><span class="n">arange</span><span class="p">(</span><span class="mi">0</span><span class="p">,</span> <span class="nb">len</span><span class="p">(</span><span class="n">x</span><span class="p">))</span> <span class="o">/</span> <span class="n">sr</span>

<span class="n">a</span> <span class="o">=</span> <span class="n">signal</span><span class="p">.</span><span class="n">butter</span><span class="p">(</span><span class="mi">5</span><span class="p">,</span> <span class="p">[</span><span class="mi">4000</span><span class="p">,</span> <span class="mi">10000</span><span class="p">],</span> <span class="n">btype</span><span class="o">=</span><span class="s">"band"</span><span class="p">,</span> <span class="n">fs</span><span class="o">=</span><span class="n">sr</span><span class="p">,</span> <span class="n">output</span><span class="o">=</span><span class="s">"sos"</span><span class="p">)</span>
<span class="n">y</span> <span class="o">=</span> <span class="n">signal</span><span class="p">.</span><span class="n">sosfiltfilt</span><span class="p">(</span><span class="n">a</span><span class="p">,</span> <span class="n">x</span><span class="p">)</span>
</code></pre></div></div>

<p>After filtering we can see on the waveform in the figure below that most of the noise of the microwave has been removed.</p>

<p><img src="../assets/img/posts/2024-01-07/filtered_waveform.png" alt="Filtered waveform of the popcorn popping" /></p>

<p>And now that we have removed much of the noise, we can zoom in on one single pop, and see what shape a pop takes in time (since we already “know” they are pulses which are uniform in frequency). Looking at the next figure we see that an impulse that decays exponentially. What is mostly of interest for this first implementation of a popcorn detector is the decay time, which from the plot below seems to be about 0.1 seconds. The exponentially decaying nature of the absolute waveform might be of interest in a more robust algorithm.</p>

<p><img src="../assets/img/posts/2024-01-07/singlepop.png" alt="Absolute waveform of a single popcorn popping" /></p>

<h1 id="2-my-naive-algorithm">2. My Naive Algorithm</h1>
<p>While using the shape of the shape of the waveform of a popcorn popping might be good for detecting individual pops, it seemed like a lot of work, so I chose to go with a more naive algorithm for now.</p>

<p>I chose to use the uniformity of the spectrum of a popcorn pop, and came up with the following algorithm:</p>
<ol>
  <li>Calculate the STFT $X$ of the signal $x$.</li>
  <li>Iterate through the time slices of $X$
    <ol>
      <li>Check the mean value $\mu$ of the frequencies of $X$ which are between $f_{c1}$ and $f_{c2}$</li>
      <li>Calculate 
\(\lambda=\sum_{f_{c1}&lt; \omega &lt; f_{c2}} |\mu - X_\omega(t) |^2\)
 for all the given time iteration $t$</li>
      <li>If $\lambda$ is larger than some threshold $\lambda_0$ then we call that a pop, and we skip the next iterations, corresponding to 0.1 seconds (this value is gained from the approximate time it takes a popcorn kernel to pop).</li>
    </ol>
  </li>
  <li>Calculate the time between each pop, and see if we are getting close to the value the manufacture specifies is the correct time between pops.</li>
</ol>

<p>While this algorithm might seem ingenious and perfect, it does have some flaws that one might point out, even before testing it at all:</p>
<ol>
  <li>You have to know what value to set for $\lambda_0$.</li>
  <li>The tool has no way of distinguishing between popcorn pops and perfect silence.</li>
  <li>It might be slightly ineffective to carry out this many sums of squares calculations each second.</li>
  <li>The algorithm doesn’t allow for multiple pops to occur within a time-span of 0.1 seconds.</li>
</ol>

<p>Do note that a plus of this algorithm is that we do not need to filter the signal, since we only consider the frequency range where we have assumed that no microwave noise is negligible.</p>

<p>Hence, the title of this section. But no matter, let’s see how this algorithm performs after tweaking the $\lambda_0$ parameter.</p>

<h1 id="3-does-the-algorithm-detect-popcorn">3 Does the algorithm detect popcorn?</h1>
<p>By seeing what values $\lambda$ had for times when no popcorn were popping it seemed that $\lambda_0=4\cdot10^{-5}$ was a good value. This would remove most of the false positives induced by the noise in the signal, while still allowing relatively silent pops to be caught by the algorithm. I also cut the first 62 seconds of the signal for this test, since this is when the popcorn started popping.</p>

<p>Looking at the figure below, we see a wide angle view of when the individual pops where detected. By looking at the amount of red dots centered around the more busy parts of the signals, this seems to be a decent algorithm.</p>

<p><img src="../assets/img/posts/2024-01-07/detected_popcorn_wide_test_1.png" alt="Wide view of popcorn detections" /></p>

<p>It is however not easy to make out individual pops this way, so I zoomed in on a part of the signal which highlights that this algorithm seems to work fine under the conditions of this test.</p>

<p><img src="../assets/img/posts/2024-01-07/detected_popcorn_narrow_test_1.png" alt="Narrow view of popcorn detections" /></p>

<p>Looking at the figure above we see that the algorithm actually gets decent performance on this part of the signal. Scanning across the waveform it looks like the algorithm catches most of the pops which occur. And looking at the resulting time between pops, it does look promising.</p>

<p><img src="../assets/img/posts/2024-01-07/time_between_pops_test_1.png" alt="Time between pops, not smoothed" />
<img src="../assets/img/posts/2024-01-07/time_between_pops_smoothed_test_1.png" alt="Time between pops, smoothed" /></p>

<p>Seeing that taking a moving average with a window-size of 5 creates results that look like the one above, one might be tempted to slap this algorithm onto a microcomputer, wire it up to a microwave, and create a Kickstarter with a silly name. But this is a blog of science, so I did actually do more than one test on this algorithm.</p>

<h1 id="4-does-the-algorithm-work-a-second-time">4 Does the algorithm work a second time?</h1>
<p>I used the exact same code as I did in the previous test, but changed the microwave and the brand of popcorn. Ideally I would’ve also used a different method of recording, but that might be covered in an improved popcorn detection algorithm.</p>

<p><img src="../assets/img/posts/2024-01-07/detected_popcorn_wide_test_2.png" alt="Wide view of popcorn detections, again" /></p>

<p>Above is a wide view of the detections in the second test. I was happy and surprised to see that the algorithm seemed to have worked. I had expected the algorithm to either detect basically no popcorn, or to have a lot of false positives. Zooming in we see that there seem to be no false positives, but some pops are not detected.</p>

<p><img src="../assets/img/posts/2024-01-07/ddetected_popcorn_narrow_test_2.png" alt="Narrow view of popcorn detections, again" /></p>

<p>One would expect the algorithm to call the popcorn done before they were actually done, given that some pops were not detected. But even though that the time between pops is calculated to be higher than what it actually is, we still ended up getting popcorn that had been in the microwave for too long.</p>

<p><img src="../assets/img/posts/2024-01-07/time_between_pops_smoothed_test_2.png" alt="Time between pops, smoothed, again" /></p>

<p>Above we see the smoothed time between pops, and it never even reached 2 seconds. Even when not smoothing the time between pops, the time never got higher than 1.6 seconds. This means that if we had only used the algorithm to evaluate the doneness of the popcorn, We would’ve burned the popcorn.</p>

<h1 id="5-conclusion">5 Conclusion</h1>
<p>Much to my surprise, the algorithm seemed to have worked, to some extent. The detection of individual pops works quite well, even though it does miss some pops. If we were to use this detection method, along with the instructions on popcorn packages that say to wait until pops are 2 to 3 seconds apart, we would burn our popcorn. So I need a new way of evaluating when the popcorn are done, if I wanted to keep using this method of detection.</p>

<p>I might continue on this project, and change/improve some things. Among these are</p>
<ol>
  <li>I want to use a new way of detecting, namely matched filtering which seems interesting to learn about.</li>
  <li>I want to use the <a href="https://people.csail.mit.edu/hubert/pyaudio/docs/">PyAudio</a> library to stream the audio to a Python script, so I can evaluate the performance of my algorithm by actually using it to create popcorn.</li>
</ol>]]></content><author><name>Anders Lauridsen</name></author><category term="journal" /><category term="signalprocessing" /><category term="audio" /><category term="python" /><category term="popcorn" /><category term="detection" /><summary type="html"><![CDATA[My hope is that one day this blog will be filled with overengineered solutions to problems that either don’t exist, or are or of so little concern that they aren’t worth the effort of solving.]]></summary><media:thumbnail xmlns:media="http://search.yahoo.com/mrss/" url="https://blog.anders-lauridsen.dk/royalty_free/georgia-vagim-ny-lHmsHYHk-unsplash.jpg" /><media:content medium="image" url="https://blog.anders-lauridsen.dk/royalty_free/georgia-vagim-ny-lHmsHYHk-unsplash.jpg" xmlns:media="http://search.yahoo.com/mrss/" /></entry><entry><title type="html">Creating my Website</title><link href="https://blog.anders-lauridsen.dk/creating-my-website" rel="alternate" type="text/html" title="Creating my Website" /><published>2023-09-30T00:00:00+00:00</published><updated>2023-09-30T00:00:00+00:00</updated><id>https://blog.anders-lauridsen.dk/creating-my-website</id><content type="html" xml:base="https://blog.anders-lauridsen.dk/creating-my-website"><![CDATA[<ul>
  <li><a href="#1-my-old-website">1. My old website</a></li>
  <li><a href="#2-my-new-website">2. My new website</a>
    <ul>
      <li><a href="#21-idea-for-the-new-site">2.1. Idea for the new site</a></li>
      <li><a href="#22-technology-behind-the-site">2.2. Technology behind the site</a></li>
    </ul>
  </li>
</ul>

<h1 id="1-my-old-website">1. My old website</h1>

<p>This is not the first iteration of my personal website. Back in December 2020 I decided to create my own personal website. My idea was to have a place to showcase whatever projects I had worked on, and perhaps for general blogging (I later realized that a 2nd semester project about <a href="https://en.wikipedia.org/wiki/Eigenface">Eigenfaces</a> wouldn’t exactly be the most appealing project on my site…). <br />
Even so I decided to continue to work on my site, by finding and buying a template that I liked, in order to get up and running quickly. I created a somewhat decent website if I do say so myself. If you’re interested you can check out the history of commits on the <a href="https://github.com/ahll19/ahll19.github.io">repository</a>, though the naming of the earlier commits aren’t always the most useful. Though, some idea of what the website looked like can be gleamed from the images below.</p>

<p><img src="/assets/img/posts/2023-09-30/header.png" alt="Header of my old website" title="Header of my old website" /></p>

<p>While I was, and am still, happy with how the website looked, it was difficult to change the look of the website. Since I understood none of the tools that went in to creating the first website, I had trouble changing the contents of the site (specifically adding a blog-post functionality). Instead, I was stuck with this look on the site
<img src="/assets/img/posts/2023-09-30/body.png" alt="Content of my old website" title="Content of my old website" />
which does not lend itself to the blogging format.</p>

<p>My contact page also used a third party service, and was not really practical, so I wanted to scrap that as well.
<img src="/assets/img/posts/2023-09-30/contact.png" alt="Old contact form" title="Old contact form" /></p>

<h1 id="2-my-new-website">2. My new website</h1>
<p>As you can see the new website is drastically different from the old one. The old website functioned as a sort of online resume, more than anything else. I generally dislike having to write resumes, so having to write two when applying for a job, or when they need updating, seemed excessively meaningless.</p>

<h2 id="21-idea-for-the-new-site">2.1. Idea for the new site</h2>
<p>I want to work on smaller projects, as I have done for the last couple of years, but in a more structured manner. I wanted somewhere to showcase these projects, and a personal blog seemed like the perfect way to do it.</p>

<p>My hope is that this blog will grow with interesting subjects over time, regarding mathematics, data-analysis, home-automation, and more.</p>

<h2 id="22-technology-behind-the-site">2.2. Technology behind the site</h2>
<p>I host the page on GitHub Pages, since I don’t need anything dynamic, and it’s free to host a site there.</p>

<p>I searched the internet and <a href="https://github.com/jekyll/jekyll">Jekyll</a> Seemed like a good choice to build the website in, so I decided to go with that, since it can build static HTML sites from Markdown, which makes my life easier.</p>

<p>I started out by following this <a href="https://docs.github.com/en/pages/setting-up-a-github-pages-site-with-jekyll">guide</a>, which worked fine in the beginning. I did have some trouble getting a TeX engine (used for creating equations like this $E=mc^2$) working both locally and on the GitHub’s build system. After scouring the internet for solutions that worked either on GitHub or locally, I decided to find a template that had <a href="https://www.mathjax.org/">Mathjax</a> properly configured from the get-go. And so I ended up going with <a href="https://github.com/LeNPaul/Lagrange">Lagrange</a>, a beautiful and easy to set up template.</p>

<p>Both the guide on GitHub and the guide included in the Lagrange repository are great to get started, and I highly recommend those guides if you want to build you own GitHub Pages site.</p>]]></content><author><name>Anders Lauridsen</name></author><category term="journal" /><category term="website" /><category term="meta" /><summary type="html"><![CDATA[1. My old website 2. My new website 2.1. Idea for the new site 2.2. Technology behind the site]]></summary><media:thumbnail xmlns:media="http://search.yahoo.com/mrss/" url="https://blog.anders-lauridsen.dk/royalty_free/web-design.jpg" /><media:content medium="image" url="https://blog.anders-lauridsen.dk/royalty_free/web-design.jpg" xmlns:media="http://search.yahoo.com/mrss/" /></entry></feed>